Flashing Raspberry PI os into emmc memory
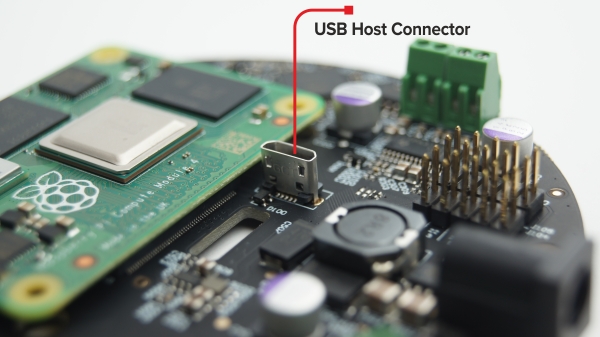
For flashing use J103 mini usb connector. You do not need use any jumpers (just connect the SaraKIT USB cable to your PC Computer).
-
Download and run the Windows installer to install the drivers and boot tool.
-
Apply power to the board; Windows should now find the hardware and install the driver.
-
Once the driver installation is complete, run the
RPiBoot.exetool that was previously installed. -
After a few seconds, the Compute Module eMMC will pop up under Windows as a disk (USB mass storage device).
(for other systems see here https://www.raspberrypi.com/documentation/computers/compute-module.html#setting-up-the-cmio-board)
Download and run Raspberry Pi Imager. With this software you can install your favorite OS or image prepared by us.
if you want to use a ready-made image, download it from here:
- RaspiOS 64bit Lite 6.1.21 Bullseye 8GB with OpenCV 4.5.1, Bazel, MediaPipe 16-02-2024
- RaspiOS 64bit Desktop 6.1.21 Bullseye 8GB with OpenCV 4.5.1, Bazel, MediaPipe 16-02-2024
+ (VNC Viewer for Raspberry Pi for connection to the Raspberry Pi Desktop)
do not forget to upload or set the wifi network settings file from here (wifi config) to the boot directory, i.e. to the root directory of the drive connected to Windows.
Note: We have prepared all examples and sound drivers for Raspberry Pi 64 bit, Debian with Bullseye Kernel currently in version 6.1.21 and earlier versions such as 5.15.84.
If you want to use Debian Bookworm, we have drivers for version 6.6.51, 6.6.62, 6.6.74, 6.12.34 or 6.12.75. If you run into any problems, let us know..
(for CM5, driver for versions 6.12.75 is now available)
Select the system and storage. After selecting the system and storage, click on the settings button:
Be sure to set the username and password here (the use of the PI username is not recommended).
In addition, set access to your WiFi network, without this, the device will not be able to connect to you.
Also, don't forget to check "Enable SSH".
After recording the image to disk, disconnect the power, unplug the USB and reconnect the power to the SaraKIT.
From now on, you can communicate with SaraKIT (Raspberry Pi) using your favorite program, e.g. WinScp or Putty or Visual Studio Code.
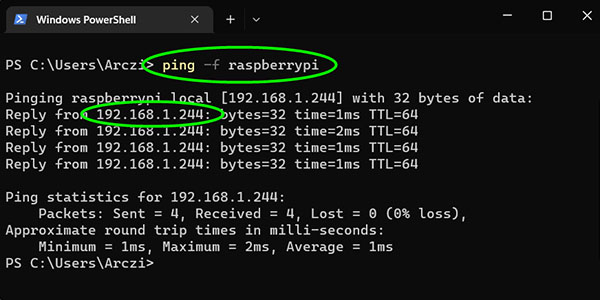
How to Find Your Pi’s IP Address from a Windows Computer on the Same Network?
- On a Windows computer that’s on the same network as your Pi, launch the command prompt by typing cmd into the search box and pressing Enter.
- In the command prompt window, type ping -f raspberrypi (or nslookup raspberrypi):
other ways: https://helpdeskgeek.com/networking/what-is-my-raspberry-pis-ip-address/
Regardless of what program you use to connect, you need to install some drivers for new devices offered by SaraKIT:
Updating your System
The camera software is under constant development. Please ensure your system is up to date prior to using these instructions.
sudo apt-get update
#sudo apt-get full-upgrade
Useful tools and drivers
//git is always needed
sudo apt-get install git
#//Pi config
#sudo wget --backups=1 https://saraai.com/_SaraKIT/config.txt -P /boot/
#sudo reboot

//or for Bookworm (Kernel > 6.1)
sudo wget --backups=1 https://saraai.com/_SaraKIT/config.txt -P /boot/firmware/
sudo reboot
//camera
sudo wget https://datasheets.raspberrypi.com/cmio/dt-blob-dualcam.bin -O /boot/dt-blob.bin
wget https://saraai.com/_SaraKIT/rpi_userspace_20211215-1_arm64.deb
sudo dpkg --force-all -i rpi_userspace_20211215-1_arm64.deb
wget --backups=1 https://saraai.com/_SaraKIT/.bashrc -P /home/pi/
sudo reboot

//test
#export LD_LIBRARY_PATH=/opt/vc/lib/
#export PATH=$PATH:"/opt/vc/bin/"
raspistill -v -cs 0 -o testcam0.jpg
raspistill -v -cs 1 -o testcam1.jpg
more on https://www.raspberrypi.com/documentation/accessories/camera.html
//Audio
//download script for download and install prebuilt audio driver for CM4
wget --backups=1 https://saraai.com/_SaraKIT/audio/audio_install.sh
//simply run script for download and install prebuilt aduio driver
chmod +x audio_install.sh
./audio_install.sh

//download script for download and install prebuilt audio driver for CM5
wget --backups=1 https://saraai.com/_SaraKIT/audio/audio_install_cm5.sh
//simply run script for download and install prebuilt aduio driver
chmod +x audio_install_cm5.sh
sudo bash audio_install_cm5.sh


//After installation rpi will reboot automatically

//For now you can verify your audio
//Play test song
aplay -f S16_LE -r 16000 -c2 -Dplug:dmix scripts/SaraKit_TestSound.wav

//Record audio
arecord -d5 -f S16_LE -r 16000 -Dplug:dsnoop -c2 recorded.wav
aplay -f S16_LE -r 16000 -c2 -Dplug:dmix recorded.wav

//List output devices
aplay -l
//List input devices
arecord -l (FAQ: No Sound or Silent Recordings & Gimbal Issues)
The easiest way to install OpenCV, Bazel and MediaPipe for Raspberry Pi 4 64 bit (5.15.84,6.1.21)
If you will use functions related to image processing or the fastest face detection on the Raspberry Pi, you will need a set: OpenCV + Bazel + MediaPipe:
https://github.com/SaraEye/Install-OpenCV-Bazel-MediaPipe-Raspberry-Pi-64-bits
Magnetic Rotary Encoder AS5048A
git clone https://github.com/SaraEye/SaraKIT-AS5048A-AS5600-encoder-Raspberry-Pi EncoderDemo
cd EncoderDemo
make
./gimbals